Saturday, June 15, 2013

check character type in php

How to check character type in PHP?

This tutorial will explain you how to check character types using PHP
Check character type in PHP

Check character types

When you are doing programming you may need to check the character types before process the data. For an example you have a web form that allows user to enter numbers only. So your program should accept numbers only. To perform this you have to check user input has valid numbers. Sometimes you may need to enter alpha numeric characters only. PHP has nice function set for checking character type. Using those methods you can check whether a character or string falls into a certain character class.


Note: These methods return TRUE if every character in the string matches the requested criteria otherwise FALSE.

Check alphanumeric characters in PHP.

You can check if all of the characters in the provided string containing alphanumeric (letters and integers) only by using ctype_alnum() function. This will return TRUE only if the provided string containing [A-Z a-z 0-9] characters. It does not matter simple or capital letters. You can use this method to validate user inputs such as user name, product name or product code, etc. See bellow example how to check if a string containing English alphabetic characters and numbers only. Remember sometimes you may be separate two words using a space character. This will cause to return FALSE value because "space" it not a valid alphanumeric character.

<?php 	 
$input_texts = array("Hello World","PHP","What?","2013");

foreach($input_texts as $input){
	if(ctype_alnum($input)){
		echo $input." has letters and numbers only<br/>";
	}else{
		echo $input." has not only letters and numbers<br/>"; 
	}
}
?>
 

Check Alphabetic letters in PHP.

Sometimes you may need to check a given string or text contains only letters (A-Z,a-z). In such cases you can use ctype_alpha() function to check if the string has only letters. This is useful when you are validating user name, first name or last name.

<?php 	 
$input_texts = array("lettersOnly","HAL9000","pami@gmail.com","PHP");

foreach($input_texts as $input){ 
	if(ctype_alpha ($input)){
		echo "Your input contains Letters only<br/>";
	}else{
		echo "Your input does not consist of all letters<br/>"; 
	}
}
?>
 

Check numeric characters in PHP.

Suppose that you have to check particular text or string contains only numbers 0-9. You can use ctype_digit() function to do that. This function will return TRUE only if the given string or text contains numbers 0 to 9 otherwise it returns FALSE. You can use this method to validate age of a person, passengers in a bus, members of a family. Because this will check integers only.

<?php 	 
$input_texts = array("2014","12.45","2011/11/11","No28","2nd");

foreach($input_texts as $input){ 
	if(ctype_digit ($input)){
		echo "Integers only<br/>";
	}else{
		echo "Not contain integers only, there are other characters too<br/>"; 
	}
}
?>
 

Check hexadecimal digits in PHP.

Suppose that you have to check particular text or string contains only hexadecimal digits. For an example to validate HTML color code you have to check all characters are valid hexadecimal digits. You can use ctype_xdigit() function to check this. Hexadecimal numbers contains letters from 'A' to 'F' and numbers from 0 to 9.

<?php 	 
$input_texts = array("2014","12.45","ABCDEF","ABXYZ","fffEEE","00EF",0.56);

foreach($input_texts as $input){ 
	if(ctype_xdigit ($input)){
		echo $input." has Hexadecimals only";
	}else{
		echo $input." has not Hexadecimals only";
	}
}
?>
 

Check UPPER case and lower case in PHP.

Sometimes you may have to check the case sensitivity of a given word. Suppose that you have check captcha code in PHP, some websites allows you to enter captcha code without considering lower or upper case. If you need to check the case of a word or string in php you can use ctype_lower() function to determine lower case characters and ctype_upper() function to determine upper case characters.

<?php 	 
$input_texts = array("siple","hello world","CAPITAL","ProGAMMinG");

foreach($input_texts as $input){ 
	if(ctype_upper($input)){
		echo "uppercase character only";
	}elseif(ctype_lower($input)){
		echo "lowercase character";
	}else{
		echo "not only uppercase or lowercase"; 
	}
}
?>
 

Check whitespace characters/spaces in PHP.

You can check for white space characters using ctype_space() function. It returns TRUE only if all characters in the given text contains white spaces.

<?php 	 
$input_texts = array("text_a"=>"  ", "text_b"=>"\n", "text_c"=>PHP_EOL,
					 "text_d"=>" ", "text_e"=>"\r", "text_f"=>"\t",
					 "text_g"=>"\n\r\t","text_h"=>"on the way");

foreach($input_texts as $key=>$input){ 
	if(ctype_space($input)){
		echo $key." space character only";
	}else{
		echo $key." not only spaces "; 
	}
}
?>
 

Note: line feed(\n), vertical tab(\t), carriage return(\r) are considered as white spaces. In above example, all values except 'text_h' contains space characters.

Check control characters in PHP.

Control characters are also considered as non-printing characters. It is a code/set of characters that does not represent a written symbol. Using ctype_cntrl() function you can identify control characters. If a given text containing all characters of control it returns TRUE otherwise FALSE.

<?php 	 
$input_texts = array("text_a"=>"\f","text_b"=>"\n","text_c"=>PHP_EOL, 
					 "text_d"=>"\0","text_e"=>"\r","text_f"=>"\t",
					 "text_g"=>"\n\r\t","text_h"=>"on the way","text_i"=>"  ",
					 "text_j"=>"\b");

foreach($input_texts as $key=>$input){ 
	if(ctype_cntrl ($input)){
		echo $key." is control character";
	}else{
		echo $key." is not a control character"; 
	}
}
?>
 

Output: In above example values up to 'text_g' are contains control characters. others are not control characters.

Check printable characters in PHP.

Printable characters means characters that actually create output (including spaces/blanks). You can identify printable characters using ctype_print() function. Also you can determine all printable characters except white spaces using ctype_graph() function.

<?php 	 
$input_texts = array("text_a"=>"\f","text_b"=>"\n","text_c"=>PHP_EOL, 
					 "text_d"=>"\0","text_e"=>"\r","text_f"=>"\t",
					 "text_g"=>"\n\r\t","text_h"=>"  ","text_i"=>"welcome");

foreach($input_texts as $key=>$input){ 
	if(ctype_print ($input)){
		echo $key." has all printable character";
	}else{
		echo $key." is containing non printable character"; 
	}
}
?>
 

Output: if you check using ctype_print() function , values all up to 'text_g' contains non printable characters. 'text_h ' and 'text_i' contains all printable characters. If you use ctype_graph() function, only 'text_i' considered as printable characters. Because space/white spaces are ignored.
Sunday, June 9, 2013

PHP Error handling-part 1

Error Handling in PHP - part-1

This article explains you how to handle errors in PHP

What is Error Handling?

Errors are common when dealing with programming languages. Everyone have experience with errors when writing programs. Errors may occur due to several reasons. Sometimes there will be codes with syntax errors or there will be an unexpected conditions during the execution of your program. You can identify syntax errors at the compile time. suppose that you have to read an XML file or write text file to a folder. At the run time, the file or directory might not be exists. So your program encountered with an error. But you can mange this by check file/folder existence before read/write it. Likewise there are program techniques and in-built methods to handle program errors. This tutorial will explain you error handling configurations in PHP.


Why we need to handle programming errors?

Errors may not only cause to stop your program execution but also give chances to hackers to destroy your system. When program stops with an error, it shows the reason for the error and print a stack trace (this will depend on your php configuration). This will open a back door to the system and there can be a great security risk. Errors leads to providing an attacker with more information that he can use to break your system. So if you forget to handle errors, any one can see the error and the reason for the error. This may cause to reveal your internal file structure to a third party. This is a dangerous case. So error handling is very important in every programming language.

Advantages of handling errors

You can simply off the error reporting using PHP configuration file. (php.ini). But it is not a good idea. Because user get confused. Because there is no clear explanation about the error. So user will be lost. He don't know what has happened. So at least you have to say "An unexpected error has occurred" to the user. So user will know there is a critical error and difficult to continue the program execution. As a programmer you can write a log file with the error details and create bug reports for analyze the problem later. Error handling makes your system more secure. Because no one see the actual error message or internal file paths.

How to write error free code?

We can catch an identify most of the programming errors. Errors break the normal flow of the program execution. This may happen due to following reasons.

  • Usage of uninitialized variables.
  • divided by zero.
  • Invalid function arguments or user inputs.
  • NULL references.
  • Endless loops / recursive functions.
  • Program meets an un expected condition.
  • Unavailability of file, database, or network resource.
  • Disk faults and network errors.
Most of the errors can occur due to reasons mentioned above. If you follow good programming rules and practices you can write bugs free code. Before you use a variable, initialize it. Or you can set a default value to that variable. Then try to identify the requirement, conditions and inputs. For an example you have to develop a simple program for add two numbers and return the sum. So it is clear all inputs must be numbers (integers or floats). Before you pass function arguments you have to check whether the all inputs are in correct format otherwise you can let the user to re-enter values. Some errors occur due to unexpected conditions. As an example you have to read a text file to get a value. You can't always expect the file in the directory during the program execution. If file is not present, program terminated with an error. So what you have to do is check the file existence before read the file. If file does not exists you can give customized error message instead of stack trace. Likewise you have to carefully analyze the problem and need to check every condition that can meet. Also readability of your code and comments make it easy to track the errors.


Error handling settings in PHP

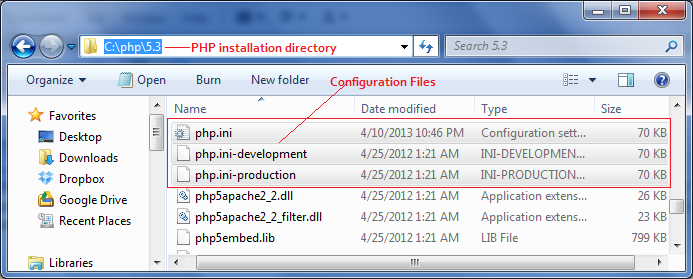
PHP has good error reporting mechanism for error handling and logging. Error reporting controlled via php configuration file (php.ini). You can see the php configuration file in your PHP installation folder. By default PHP comes with two configuration files.

PHP configuration file

You can see there are two configuration files named "php.ini-development" and "php.ini-production". Before you upload your code to live server you have to test it locally. So use "php.ini-development" file in your local development environment. Because it contains settings recommended for use in development environments. php.ini-production file contains settings recommended for use in production servers.

When you configure php with apache web server, rename one of the above files to php.ini (this depends on your requirement). Before you do modifications to the original configuration files it is wise idea to keep a copy of that file with you.

Security is very important in production servers. So "php.ini-production" file contains security and performance settings. It never shows errors to the application users. But in development version it shows all errors. Because it helps developers to identify issues in the program. For an example you can use a variable without initializing before you use it. Under development settings it will show you a notice regarding the undefined  variable. But under the production environment it does not show any warning.

When PHP starts up it reads the php.ini file This happens every time when you starts the web server. If you use apache web server, you can specify where the php configuration file is located. To do this open the apache installation folder and search for httpd.conf file. In windows system by default it is located in "C:\Program Files\Apache Software Foundation\Apache2.2\conf" directory.

PHP Apache Configuration File


Use PHPIniDir variable in apache configuration file to specify the php.ini file. it tells the apache to the where to search for php.ini file. By default PHP search C:\Windows directory for the php.ini file.

Set PHPIniDir in Apache2.2

Also you can set custom php configuration files in each directory. Then it overrides default configuration settings according to the new file. But this will make your system more complex. because you have to refer all configuration files when fixing bugs. In shared hosting environments you can't override all settings in the parent php.ini file by using your custom file. There are some limitations. Also you can change some settings at the runtime. That means you can specify php.ini directives in your code. You can use string ini_get ( string $varname ) to view the current setting and string ini_set ( string $varname , string $newvalue ) to set new values at the runtime. Also you can set these values in .htaccess file. You can set all error reporting directives at the run time.

PHP configurations settings for handling errors

You can see there are list of settings that are related to error reporting in php; under the "Error handling and logging" section of the php.ini file. That directive informs PHP to which errors should be displayed and which are not. Error reporting is a process that consume server resources. Because it increase the I/O activity when logging every error to the log file.

PHP Error reporting and logging

In PHP there are number of Error Level Constants that use to report errors. You can customize those settings. By default error_reporting is set to E_ALL | E_STRICT. This means it displays all errors and notices. You can set this option in your development server. Errors are classified to several groups. Basically there are

  • Errors - about Fatal runtime errors- It stops the program execution
  • Warnings -about run time warnings/ non fatal errors - Can continue script in to some extend
  • Notices - about run time notices - can continue program execution.
  • Deprecated - about code that will not work in future versions.
Above sections again divide into sub sections. For a example Warnings divide in to E_WARNING, E_CORE_WARNING, E_COMPILE_WARNING, E_USER_WARNING. These constant values have associated integer value. You can use both values in php.ini file and in your php code.

Also you can use combination of above constants with bitwise operators ('|', '~', '!', '^' and '&'). ~ is use to exclude a error level and | is use to include error level.

Usage:
error_reporting = E_ALL & ~E_NOTICE
(Show all errors, except for notices and coding standards warnings.)

If you need to show errors only you can set,
error_reporting = E_COMPILE_ERROR|E_RECOVERABLE_ERROR|E_ERROR|E_CORE_ERROR

Likewise you can set custom error_reporting values.

Display Errors in PHP

You can set display errors ON or OFF. This section divide into two sections program errors and startup errors. Startup errors are errors that occur during PHP's startup process. For a example fail to load specific library cause such kind of error. If you off display errors, no errors will be displayed even there are fatal errors. By default this directive set to On in development environments while it set to Off in production environments. This only stops displaying errors to the user. But errors are logged in the error log. You can see errors by opening the error log.

Usage:
display_errors = On
(Show all errors which are specified in error_reporting directive)
display_errors = Off (Prevent displaying errors to the user)

display_startup_errors = On (show errors which occur during PHP's startup)
display_startup_errors = Off (hide PHP's startup errors)

Logging Errors in PHP

PHP can log errors to a server specific log. By default all errors are send to the apache error log. Log errors is very important. Because in production environment no other way to track errors. Also you can specify a error log. Using apache Virtual Hosts you can set custom error logs for each domain. This make error tracking easy. Otherwise all errors sent to one log file and difficult to filter errors. By setting custom error files you can quickly find errors related to the host. Also you can set the maximum error log file size. Sometimes you may experienced with repeated error messages. Suppose that you have forget to pass a function argument in a loop. This will cause to repeat the same error for several times. With PHP error logging settings, you can ignore repeated errors. If you enable this setting no repeated errors will be displayed.

Apache Error Log

Usage:
log_errors = On
(Log errors to the error log file)
log_errors = Off (Disable the error log)

log_errors_max_len = 1024 (set the maximum error log file size)
log_errors_max_len = 0 (maximum error log file size not applied)

ignore_repeated_errors = Off (No repeated errors will be logged in the same file)
gnore_repeated_errors = On (Repeated errors will be logged)

ignore_repeated_source= On (If the same error occurred in different files ignore repeated source)
ignore_repeated_source= Off (Display same the same error if they appear in different files)

report_memleaks = On (Memory leaks will be logged. This has only effect in a debug compile)
report_memleaks = Off (Memory leaks will not be logged)

track_errors = On (Store the last error/warning message in $php_errormsg)
track_errors = Off (No errors.warnings will be stored in $php_errormsg)


How to log errors to a custom file in PHP?

By default all PHP errors are send to Apache error log. You can change this and set to a custom file. Also you can send PHP errors to system event log.

error_log = my_php_error.log (Log errors to your custom file)
error_log = syslog (Log errors to system event log)

You can this directive empty to send errors to Apache error log (Default PHP behavior).


PHP Error display settings

You can control error display settings in PHP. Basically PHP displays errors as HTML out put and with links to php documentation related to that error. It is easy to understand the error. However this feature is recommended to disable on live production servers due to security and performance reasons. But it is easy to use local documentation in your development server. because you can easily access to the documentation Also no internet access required.

You can format error messages using some CSS formatting. PHP allows you to append HTML elements to the beginning of an error and the ending of an error message. See bellow configuration to setup local PHP documentation.

  • Download PHP manual (Many HTML Files compressed version- tar.gz)
  • Create a folder named "phpmanual" and extract downloaded file in to it.
  • Set docref_root php directive to "http://localhost/phpmanual/"URL

  • Usage:
    html_errors = On
    (Inserting HTML links to documentation related to that error)
    html_errors = Off (No documentation links)

    docref_root = "http://localhost/phpmanual/" (Your local copy of PHP documentation)
    docref_ext = .html (Hide PHP's startup errors)
    error_prepend_string = "<span style='color: #ff0000'>" (String to output before an error message)
    error_append_string = "</span>" (String to output after an error message)

    Note: you can add span or div tags for prepend and append strings and use CSS to change the styles.

    Friday, May 31, 2013

    validate drop down list using jQuery

    How to validate drop down list using jQuery?

    This tutorial explain how to validate drop down list in jQuery
    jQuery-list-box-drop-down-validation

    jQuery list menu/drop down/list box validation script

    jQuery is the most easy way to do JavaScript client side validations. jQuery is fast and simple to use. You can reduce most of the code lines by using jQuery. However as a beginner it is better to learn drop down validation using pure JavaScript also. Drop down menu's or list boxes are very common is out day to day programming life. List menu's are use to get user inputs from list of given options. There can be single select or multiple select list boxes. This example based on a single select dropdown menu. First of all you have to download jQuery library. You can develop attractive web sites using jQuery and jQuery Color plugin. Always try to give meaningful and eye caching message to the user. Because UI development is an important factor.

    Demo: Validate list menu using jQuery. Copy and paste given sample code into a blank HTML file and see how it works.

    Example 1: validate user's birthday.

    This example use jQuery for validate user birthday. There are three dropdown lists for year, month, and day respectively. Before user click on submit button, he/she need to select his/her birthday correctly. You have to consider particular year is a leap year or not. If so, February month of that year has 29 days. Rest of years; it has 28 days for month of February. Then you have to consider maximum days for a month. If a user entered invalid date he will be informed to re-enter correct date. This example use JavaScript alert boxes for user notifications.

    Select Your Birthday
         

    <!DOCTYPE HTML>
    <html>
    <head>
    <meta charset="utf-8">
    <script src="//ajax.googleapis.com/ajax/libs/jquery/1.10.0/jquery.min.js"></script>
    <script type="text/javascript">
    $(document).ready(function(e) {
    $("#btn_submit").click(function(e) {
    var days_of_month=Array(31,29,31,30,31,30,31,31,30,31,30,31);

    var year = parseInt($("#year").val());
    if(year==0){
    alert("Please select Year");
    $("#year").focus();
    return false;
    }

    var month = $("#month").val();
    if(month==0){
    alert("Please select Month");
    $("#month").focus();
    return false;
    }

    var day = $("#day").val();
    if(day==0){
    alert("Please select Day");
    $("#day").focus();
    return false;
    }

    if(month==2 && year%4==0 && day>days_of_month[1]){
    alert("February can't have more than 29 days except in leap year");
    $("#day").focus();
    return false;
    }else if(month==2 && day>28){
    alert("February can't have more than 29 days except in leap year");
    $("#day").focus();
    return false;
    }else if(day>days_of_month[month-1]){
    alert($("#month :selected").text()+ " can't have more than "+days_of_month[month-1]+" days");
    $("#day").focus();
    return false;
    }

    alert("OK, Your selection is valid");
    return true;
    });
    });
    </script>
    <title>Untitled Document</title>
    </head>
    <body>
    <form action="http://www.latestcode.net" method="post" enctype="multipart/form-data" name="form_bd"><table border="0">
    <tr>
    <td>Select Your Birthday</td>
    <td><label for="month">
    <select name="year" id="year">
    <option value="0" selected="selected">Year</option>
    <option value="1980">1980</option>
    <option value="1981">1981</option>
    <option value="1982">1982</option>
    <option value="1983">1983</option>
    </select>
    </label></td>
    <td><select name="month" id="month" >
    <option value="0" selected="selected">Month</option>
    <option value="1">January</option>
    <option value="2">February</option>
    <option value="3">March</option>
    <option value="4">April</option>
    <option value="5">May</option>
    <option value="6">June</option>
    <option value="7">July</option>
    <option value="8">August</option>
    <option value="9">September</option>
    <option value="10">October</option>
    <option value="11">November</option>
    <option value="12">December</option>
    </select></td>
    <td><label for="day"></label>
    <select name="day" id="day" >
    <option value="0">Day</option>
    <option value="1">1</option><option value="2">2</option><option value="3">3</option><option value="4">4</option><option value="5">5</option><option value="6">6</option><option value="7">7</option><option value="8">8</option><option value="9">9</option><option value="10">10</option><option value="11">11</option><option value="12">12</option><option value="13">13</option><option value="14">14</option><option value="15">15</option><option value="16">16</option><option value="17">17</option><option value="18">18</option><option value="19">19</option><option value="20">20</option><option value="21">21</option><option value="22">22</option><option value="23">23</option><option value="24">24</option><option value="25">25</option><option value="26">26</option><option value="27">27</option><option value="28">28</option><option value="29">29</option><option value="30">30</option><option value="31">31</option>
    </select></td>
    </tr>
    <tr>
    <td>&nbsp;</td>
    <td><input type="submit" name="btn_submit" id="btn_submit" value="Submit" /></td>
    <td>&nbsp;</td>
    <td>&nbsp;</td>
    </tr>
    </table>
    </form>
    </body>
    </html>

    Example 2: Validate dropdwon list using jQuery.

    Suppose that you have to develop an online application form for student registration. You have to take subject, class day and gender of the student. Also you have to validate user input before he submit the form. Following example example how to validate above form in jQuery. This example use javascript alerts and change the background color of the list box for user notification. In your program, use one of them.

    Online course registration
     
         
    <!DOCTYPE HTML>
    <html>
    <head>
    <meta charset="utf-8">
    <style type="text/css">
    .selection_error{
    border: 1px solid #F00;
    background-color:#FFCCCC;
    }
    .correct_selection{
    border: 1px solid #090;
    background-color:#C1FFE0;
    }
    </style>
    <script src="//ajax.googleapis.com/ajax/libs/jquery/1.10.0/jquery.min.js"></script>
    <script type="text/javascript">
    $(document).ready(function(e) {
    $.fn.changeBackground=function(component,message){
    var status = (component.val()==0)?false:true;

    if(status){//success
    component.removeClass('selection_error');
    component.addClass('correct_selection');
    return true;
    }else{//error
    component.removeClass('correct_selection');
    component.addClass('selection_error');
    alert(message);
    return false;
    }
    }

    $("#btn_register").click(function(e) {
    if(!$.fn.changeBackground($("#gender"),'Please select Gender')){
    return false;
    }

    if(!$.fn.changeBackground($("#subject"),'Please select a Subject')){
    return false;
    }

    if(!$.fn.changeBackground($("#class_day"),'Please select a Class Day')){
    return false;
    }
    alert("OK selection is valid");
    return true;
    });
    });
    </script>
    <title>Untitled Document</title>
    </head>
    <body>
    <form id="form1" name="form1" method="post" action="http://www.latestcode.net"><table border="0">
    <tr>
    <td colspan="7">Online course registration</td>
    </tr>
    <tr>
    <td>&nbsp;</td>
    <td>
    <label for="subject">
    <select name="gender" id="gender">
    <option value="0">Gender</option>
    <option value="1">Male</option>
    <option value="2">Female</option>
    </select>
    </label></td>
    <td><label for="class_day">
    <select name="subject" id="subject">
    <option value="0" selected="selected">Subject</option>
    <option value="1">Maths</option>
    <option value="2">Physics</option>
    <option value="3">Chemistry</option>
    <option value="4">Biology</option>
    <option value="5">Electronics</option>
    </select>
    </label></td>
    <td><select name="class_day" id="class_day" >
    <option value="0" selected="selected">Day</option>
    <option value="1">Sunday</option>
    <option value="2">Monday</option>
    <option value="3">Tuesday</option>
    <option value="4">Wednesday</option>
    <option value="5">Thursday</option>
    <option value="6">Friday</option>
    <option value="7">Saturday</option>
    </select></td>
    </tr>
    <tr>
    <td>&nbsp;</td>
    <td><input name="btn_register" type="submit" id="btn_register" value="Register" /></td>
    <td>&nbsp;</td>
    <td>&nbsp;</td>
    </tr>
    </table>
    </form>
    </body>
    </html>

    Example 3: Hotel booking system jQuery validation script

    Suppose that you have to develop a hotel booking system. You have to take number of nights and number of heads (both adults and children), no of rooms as user inputs. All inputs should get through list menus / drop down boxes. And you have to validate all inputs before user submit the form.

    This example based on jQuery Color plugin. So you have to download jQuery color plugin from Github.

    Hotel Booking Form
    No of Nights    
    No of heads
    No of Rooms    
         

    <!DOCTYPE HTML>
    <html>
    <head>
    <meta charset="utf-8">
    <script src="//ajax.googleapis.com/ajax/libs/jquery/1.10.0/jquery.min.js"></script>
    <script src="//code.jquery.com/color/jquery.color-2.1.0.min.js"></script>
    <script type="text/javascript">
    $(document).ready(function(e) {
    $.fn.displayNotification=function(drop_down_element){
    var status = drop_down_element.val();
    var bg_color = (status==-1)?"#FF0000":"#009900";

    drop_down_element.animate({
    backgroundColor: ($).Color(bg_color).transition("transparent", 0.2)
    },1000);
    return (status==-1)?false:true;
    }
    $("#btn_book_now").click(function(e) {
    if(!$.fn.displayNotification($('#no_of_nights'))){
    return false;
    }
    if(!$.fn.displayNotification($('#adults'))){
    return false;
    }
    if(!$.fn.displayNotification($('#children'))){
    return false;
    }
    if(!$.fn.displayNotification($('#rooms'))){
    return false;
    }
    return true;
    });
    });
    </script>
    <title>Untitled Document</title>
    </head>
    <body>
    <form id="form3" name="form3" method="post" action="http://www.latestcode.net"><table border="0">
    <tr>
    <td colspan="8">Hotel Booking Form</td>
    </tr>
    <tr>
    <td width="150">No of Nights</td>
    <td width="200"><label for="no_of_nights"></label>
    <select name="no_of_nights" id="no_of_nights">
    <option value="-1">Nights</option>
    <option value="1">1</option>
    <option value="2">2</option>
    <option value="3">3</option>
    <option value="4">4</option>
    <option value="5">5</option>
    <option value="6">6</option>
    <option value="7">7</option>
    <option value="8">8</option>
    <option value="9">9</option>
    <option value="10">10</option>
    </select></td>
    <td width="200">&nbsp;</td>
    <td>&nbsp; </td>
    </tr>
    <tr>
    <td>No of heads</td>
    <td><label for="adults"></label>
    <select name="adults" id="adults">
    <option value="-1">Adults</option>
    <option value="1">1</option>
    <option value="2">2</option>
    <option value="3">3</option>
    <option value="4">4</option>
    <option value="5">5</option>
    <option value="6">6</option>
    <option value="7">7</option>
    <option value="8">8</option>
    <option value="9">9</option>
    <option value="10">10</option>
    </select></td>
    <td><select name="children" id="children">
    <option value="-1">Children</option>
    <option value="0">0</option>
    <option value="1">1</option>
    <option value="2">2</option>
    <option value="3">3</option>
    <option value="4">4</option>
    <option value="5">5</option>
    </select></td>
    <td><label for="children"></label></td>
    </tr>
    <tr>
    <td>No of Rooms</td>
    <td><label for="rooms"></label>
    <select name="rooms" id="rooms">
    <option value="-1">Rooms</option>
    <option value="1">1</option>
    <option value="2">2</option>
    <option value="3">3</option>
    <option value="4">4</option>
    <option value="5">5</option>
    </select></td>
    <td>&nbsp;</td>
    <td>&nbsp;</td>
    </tr>
    <tr>
    <td>&nbsp;</td>
    <td><input name="btn_book_now" type="submit" id="btn_book_now" value="Book Now" /></td>
    <td>&nbsp;</td>
    <td>&nbsp;</td>
    </tr>
    <tr>
    <td colspan="4"></td>
    </tr>
    </table>
    </form>
    </body>
    </html>

    Example 4: Validate application form in jQuery

    Suppose that you have to create online job application form. User have to select age group, programming language, programming type (desktop or web) and his experience. See how to validate above registration form using jQuery.

    This example also use jQuery Color plugin.

    Online application form for programmers
    Age group
    Main programming language
    Experience
     
     
    <!DOCTYPE HTML>
    <html>
    <head>
    <meta charset="utf-8">
    <script src="//ajax.googleapis.com/ajax/libs/jquery/1.10.0/jquery.min.js"></script>
    <script src="//code.jquery.com/color/jquery.color-2.1.0.min.js"></script>
    <script type="text/javascript">
    $(document).ready(function(e) {
    $.fn.displayErrors=function(drop_down_element){
    var status = drop_down_element.val();
    var bg_color = (status==0)?"#FF0000":"#009900";

    drop_down_element.animate({
    borderColor: ($).Color(bg_color).transition("transparent", 0.2)
    },800);
    return (status==0)?0:1;
    }

    $("#btn_apply_now").click(function(e) {
    if(!$.fn.displayErrors($('#age_group'))){
    return false;
    }
    if(!$.fn.displayErrors($('#programming_language'))){
    return false;
    }
    if(!$.fn.displayErrors($('#experience'))){
    return false;
    }
    return true;
    });
    });
    </script>
    <title>Untitled Document</title>
    </head>
    <body>
    <form id="form4" name="form4" method="post" action="http://www.latestcode.net"><table border="0">
    <tr>
    <td colspan="7">Online application form for programmers</td>
    </tr>
    <tr>
    <td>Age group</td>
    <td><label for="age_group"></label>
    <select name="age_group" id="age_group">
    <option value="0" selected="selected">Age Group</option>
    <option value="1">18-24</option>
    <option value="2">25-30</option>
    <option value="3">31-35</option>
    <option value="4">36-40</option>
    <option value="5">Above 40</option>
    </select></td> </tr>
    <tr>
    <td>Main programming language</td>
    <td>
    <select name="programming_language" id="programming_language">
    <option value="0" selected="selected">Programming Language</option>
    <option value="1">Java</option>
    <option value="2">PHP</option>
    <option value="3">C#</option>
    <option value="4">Python</option>
    <option value="5">Ruby</option>
    <option value="6">VB.Net</option>
    <option value="7">C++</option>
    </select></td>
    </tr>
    <tr>
    <td>Experience</td>
    <td>
    <select name="experience" id="experience">
    <option value="0" selected="selected"s>Experience</option>
    <option value="1">1 Year</option>
    <option value="2">2 Years</option>
    <option value="3">3 Years</option>
    <option value="4">4 Years</option>
    <option value="5">5 Years</option>
    <option value="6">6 Years</option>
    <option value="7">7 Years</option>
    <option value="8">8 Years</option>
    <option value="9">9 Years</option>
    <option value="10">10 Years</option>
    <option value="11">More than 10 years</option>
    </select></td>
    </tr>
    <tr>
    <td><input name="btn_apply_now" type="submit" id="btn_apply_now" value="Apply Now" /></td>
    <td>&nbsp;</td>

    </tr>
    <tr>
    <td colspan="2">&nbsp;</td>
    </tr>
    </table>
    </form>
    </body>
    </html>

    Example 5: Validate list menu using jQuery.

    This example shows you validate list menu at the event of "onChange". As a example, a user will be submit a form without entering correct values. In such case, after click on submit button he will be displayed an error message. After that he will be select correct option. Then you have to reset error message. This demo program use additional message block to display a message to the user depending on his selection.

    Online course registration


    <!DOCTYPE HTML>
    <html>
    <head>
    <meta charset="utf-8">
    <script src="//ajax.googleapis.com/ajax/libs/jquery/1.10.0/jquery.min.js"></script>
    <script src="//code.jquery.com/color/jquery.color-2.1.0.min.js"></script>
    <script type="text/javascript">
    $(document).ready(function(e) {
    $.fn.showAnimation=function(drop_down_element){
    var status = drop_down_element.val();
    var bg_color = (status==0)?"#FF0000":"#009900";

    drop_down_element.animate({
    backgroundColor: ($).Color(bg_color).transition("transparent", 0.2)
    },1000);

    if(status==0){
    $("#note5").html('Please fill all required fields');
    $("#note5").animate({
    backgroundColor: ($).Color(bg_color).transition("transparent", 0.2),
    color:($).Color("#FFFFFF").transition("transparent",0)
    },1000);
    }else{
    $("#note5").html('');
    $("#note5").css('background-color','#FFFFFF');
    }

    return (status==0)?false:true;
    }

    $("#trip_from").change(function(e){
    $.fn.showAnimation($(this));
    });
    $("#trip_to").change(function(e){
    $.fn.showAnimation($(this));
    });
    $("#transport_type").change(function(e){
    $.fn.showAnimation($(this));
    });

    $("#btn_booknow").click(function(e) {
    var drop_downs = Array('trip_from','trip_to','transport_type');
    for(var x=0;x<drop_downs.length;x++){
    if(!$.fn.showAnimation($("#"+drop_downs[x]))){
    return false;
    }
    }
    $("#note5").html('Okay. Your selection is valid');
    $("#note5").animate({
    backgroundColor: ($).Color('#009900').transition("transparent", 0.2),
    color:($).Color("#FFFFFF").transition("transparent",0)
    },1000);
    return true;
    });
    });
    </script>
    <title>Untitled Document</title>
    </head>
    <body>
    <form id="form5" name="form5" method="post" action="http://www.latestcode.net"><table border="0">
    <tr>
    <td colspan="7">Online course registration</td>
    </tr>
    <tr>
    <td>&nbsp;</td>
    <td>
    <select name="trip_from" id="trip_from">
    <option value="0" selected="selected">From</option>
    <option value="1">City 1</option>
    <option value="2">City 2</option>
    <option value="3">City 3</option>
    </select> </td>
    <td>
    <select name="trip_to" id="trip_to">
    <option value="0" selected="selected">To</option>
    <option value="1">City 1</option>
    <option value="2">City 2</option>
    <option value="3">City 3</option>
    </select> </td>
    <td></td>
    <td><select name="transport_type" id="transport_type" class="blog_drop_down">
    <option value="0" selected="selected">Transport Method</option>
    <option value="1">Car</option>
    <option value="2">Van</option>
    <option value="3">Bus</option>
    </select></td>
    </tr>
    <tr>
    <td>&nbsp;</td>
    <td><input name="btn_booknow" type="submit" id="btn_booknow" value="Book Now" /></td>
    <td colspan="3"><span id="note5" style="padding:5px;border-radius: 4px;"></span></td>

    </tr>
    </table>
    </form>
    </body>
    </html>

    Sunday, March 17, 2013

    Create compressed zip file in PHP

    How to create compressed/zip file using PHP?

    This tutorial explains you the process of creating a zip file using PHP.
    How to create captcha image

    What is a compressed/zip file?

    A zip file is a file that contains one or more compressed files in it. That means the size of the compressed file is lower than the original file(s) and can hold many files inside it. .zip file extension is use to identify compressed files.

    There are number of compressed file formats. .zip, .rar, .7z and .gz are well known formats among them. compressed or archived files are useful when backup your data. Because if consumes less space and easily copy into removable media such as pen drive. Suppose that you have to develop a web application that sends some files to the client attached with a mail. In such case instead of attaching every file to the e-mail, you can create a compressed zip file and attach that file to the mail. Also when you are creating SQL backups, you can compressed those SQL files to save disk space and server bandwidth.

    Demo: Online file compression tool - This tool can create zip archives online. What you have to do is simply upload files to compress or enter string to compress. It is free and easy.

    Create ZIP compressed archive files using PHP?

    PHP has in-built support for creating and reading compressed archived files. In latest PHP releases (PHP 5.3 or higher) Zip extension is included by default. But in previous releases you have to enable php_zip.dll in php.ini file. PHP use ZipArchive class to provide zip functionality. It is very easy to use. Using this extension you can create and read zip/compressed files. Also you can create zip files from string inputs or by using files. This tutorial explain everything that you need to know when creating compressed files in PHP.

    How to check if zip extension is loaded?

    You can make sure Zip extension is loaded as follows. To check whether an extension is loaded or not you can use extension_loaded function.

    <?php

    if(extension_loaded('zip')){
    echo 'PHP zip extension is loaded';
    }else{
    echo 'PHP zip extension is not loaded';
    }

    ?>

    Also you can use phpinfo(INFO_MODULES) to check if the module is loaded. check zip extension is enabled.

    1. How to create zip file using string input in PHP?

    Following example code shows you to create a compressed archive file using string. That means you can make a zip file with a string input. In this exampl, entered text is convert to a text file and then it convert to a zip file. First of all check the demo program.

    <?php
    $zip = new ZipArchive();
    $archive_name = "myZip.zip";

    if ($zip->open($archive_name, ZIPARCHIVE::CREATE)!==TRUE) {
    exit("Error while opening".$archive_name);
    }

    $zip->addFromString("testfile.txt", "You can create zip files from strings. here is the example tutorial.\n");
    $zip->close();

    echo 'File size = '.number_format((filesize($archive_name)/1024),2).' Kb';
    ?>

    Above code will generate a zip file called 'myZip.zip' file in the directory which you run the PHP script. Make sure you have permission to create files in the folder. Also you can get the size of the created zip file.

    Note: You can add more than one string to the zip file. You can add multiple strings as separate files in to the zip file. Checkout bellow example to add multiple files to the archive.

    <?php
    $zip = new ZipArchive();
    $archive_name = "multiple.zip";

    if ($zip->open($archive_name, ZIPARCHIVE::OVERWRITE)!==TRUE) {
    exit("Error while opening $archive_name");
    }

    $zip->addFromString("first.txt", "This is the first string input.\n");
    $zip->addFromString("second.txt", "This is the second string input.\n");
    $zip->addFromString("third.txt", "This is the third string input. Likewise you can add multiple strings to create zip file\n");
    $zip->close();

    echo 'File size = '.number_format((filesize($archive_name)/1024),2).' Kb';
    ?>

    Wednesday, February 20, 2013

    Create captcha image in php

    How to create CAPTCHA image in PHP?

    This article explains you how to create captcha image using PHP programming language

    What is a captcha image?

    CAPTCHA stands for Completely Automated Public Turing test to tell Computers and Humans Apart. Captcha image is small image (jpg, png, or gif) with a random tiny text that use to stop automated form submission. Generally there can be characters,numbers, or combination of characters and numbers on the captcha validation image. The text on the captcha image is difficult to read at once. You have to see it carefully, to identify characters represent on the image. There are hundreds of fonts use to make captcha verification images. Also there can be irregular lines on the image. All those things make it difficult to read the text on the image. Only a human being can read and understand the text on the captcha image. No other easy method to read the verification code. Usually there are 4 to 16 characters on a captcha image. When the number of characters increased, the text is divide in to two words. So the user have to clearly identify those words.

    Demo: Create CAPTCHA validation image

    Why we use captcha verification codes/images?

    You may also experience with automated form submission. Automated form submission means submit a web form using a computer program. As an example you can use Curl to submit web forms automatically. This may cause waste server resources, exceed CPU usage and hosting provider may suspend your hosting account. Using robot programs can fill your database with garbage. This is very annoying. So computer engineers purpose the solution of captcha images. Before you submit the form you must prove that you are a real human. Captcha images are difficult to read using robot programs. Only humans can do.

    The text on the captcha image is changing randomly. If you failed to enter correct code you may ask to enter a new captcha code. Likewise verification code changes every time that you submit the form. If you fail to enter the captcha code two or three times, some captcha programs ask you to enter complex verification codes.

    How captcha image works?

    This is simple. When you request the from from the web server, at the same time it generates a session variable that contain the captcha text. There is a script that use to generate a image including the captcha string. It makes the text difficult to read. This can be achieve using several steps.

    Captcha Image Verification Process
    • Change the font style randomly (Usually captcha fonts are difficult to read at once).
    • Change the font size randomly.
    • Change captcha text randomly.
    • Add lines, dots to the image to make it difficult to read (distort the image).
    • Produce combination of simple/capital letters with numbers.
    Using above methods you can generate more reliable captcha codes. After you fill the web form, additionally you have a challenge to enter the correct captcha code. If all OK you can submit the form. At the server side first task is match the generated captcha code with the entered captcha code. Before process the request, you need to pass the captcha verification test. Once you have entered the captcha code correctly, computer recognize you as a real human and execute the rest of the program. If you failed to pass the verification test, you may again ask to enter a new captcha code. So you need to enter correct captcha code to process your request.

    Is it possible to break/crack captcha images?

    We can't 100% guarantee that captcha codes can stop spams completely. But it can effectively stop spams. Today there are many computer character recognition programs are developed to read captcha images. Those programs can identify characters in to some extent. Also they have proven such programs can pass the captcha test. But automated computer programs can't recognize all kind of verification codes. So the challenge is creating creative complex captcha images that hard to break.

    Advantages of using captcha verification images?

    1. Stop automated form submission.
    2. Stop several kinds of spams (E-mail, registration forms, forum/blog comments, etc.).
    3. Save server resources such as bandwidth, storage, memory and CPU usage.
    4. Help to read old books and digitize them. 
    5. Preventing dictionary attacks.
    6. prevent overloading web servers from spammers.
    7. Prevent automated attacks.

    Usage of CAPTCHA images?

    • When creating e-mail accounts. (Gmial, Yahoo, MSN e-mail programs ask to proof you as human using captcha codes).
    • When logging to email accounts.
    • Blog, forum comment submission.
    • In any kind of online user registration forms.
    • When downloading files from file sharing sites.
    • Any kind of user login forms.
    • Online Polls.
    • Stop sending automated queries to search engines.
    • To stop any kind of spam.

    Friday, January 25, 2013

    Read image metadata using PHP

    How to read image Metadata using PHP?

    This article explains you how to read image Metadata using PHP programming language
    Read image meta data using php exif function

    What is image Metadata?

    Image Metadata refers to piece of information that stored in a photo. These information are automatically embedded to the digital image when it was created. Usually digital cameras, iPhones, Smart phones, and other phones can store these kind of data in the captured image. Stored data can be varies from camera to camera. You have refer manufactures manuals to see what kind of data it can be stored in the image using the device. However there are some common data that stored in each and every image while they were capturing. These Meta data are stored in the headers of the images files such as jpg, jpeg, png, etc. You can use these Meta data to identify images. -eta data are like DNA's of a digital image. They knows everything of the image.

    Image Meta data contains following information in its headers.

    • Date of Captured.
    • Image Dimensions (width and height in pixels).
    • Horizontal and Vertical Resolution of the image (96 dpi).
    • Bit Depth (24).
    • Color Representation (e.g. sRGB).
    • Camera Model. (e.g. iPhone 4s)
    • Camera Maker (e.g. Apple)
    • Exposure Time (e.g. 1/15 sec.)
    • F-stop (f/2.4)
    • ISO Speed (ISO-640)
    • Focal Length (4mm)
    • EXIF Version (0221)
    • Longitude (7;52;45)
    • Latitude (6;48;21.454)
    • Altitude (21)
    • Item Type (in images jpg or png)
    • File Size
    • Owner.

    Above Metadata are common in most images. But there are lot of other information that can embedded in the digital images. Those information are differ from device to device. So there can be dozens of individual Meta data properties in the captured image. You can read those information using PHP exif library.

    Importance of image Metadata.

    You can use image Metadata to identify various information about the media; such as the author of the image, when it was taken, where it taken from, what is the camera model, copyright information, etc. Copyright information are important for the ownership. GPS data (latitude, longitude, and altitude) are useful to find the location of the photo. GPS data also important to SEO purposes. They are help to search engines to find the relevant images. Image dimensions, bit depth, resolution, image size, image type are useful when dealing with images. The applications that use to edit images such as Photoshop, CorelDraw reads these Meta data to identify the the image.


    What is Exif?

    Exif stands for Exchangeable image file format. It is maintained by Camera and Imaging Products Association (CIPA). And published by Japan Electronics and Information Technology Industries Association (JEITA). Exif is a standard that describes the formats for images and tags used by digital cameras. It also contains the technical information about the captured image, Exif data are stored in image headers and does not directly visible to the viewer. You have to use special methods to manipulate and read exif data.

    How to read Exif data using PHP?

    PHP has a extension to deal with image files. it has functions to read Metadata of the image. Before you read the exif data through the PHP exif library, you have to do some configuration to your PHP installation.

    Step 1: Enable php_mbstring and php_exif extensions in your php.ini file (PHP configuration file) To do this open your php.ini file and remove the semicolon in font of the extension.

    Step 2: Restart Apache web server.

    You have to keep in mind the order of the mbstring and exif libraries in the php.ini file. mbstring extension must be loaded before the php_exif extension. Otherwise you may get errors like follows.

    "Fatal error: Call to undefined function exif_imagetype() in D:\Projects\read-image-meta-data\exif.php on line 3" -> Solution: enable php_mbstring.dll and php_exif.dll extension respectively in the php.ini file.

    Now you are ready to read image Meta data using PHP exif library. Following examples show how to do it.

    1. How to get the image type in PHP?

    You can use exif_imagetype() function to determine the type of the image. It returns a integer value corresponding to the image type. If it fails to determine the image type it returns FALSE. Common image type constants are IMAGETYPE_JPEG (2), IMAGETYPE_PNG (3), IMAGETYPE_GIF(1), and IMAGETYPE_BMP (6). Likewise there are many other image file type constants defined in PHP. Please refer the manual. Instead of using image constants, you can also use relevant integer value for the switch cases. Following example shows you how to determine image type by reading exif data in PHP.

    <?php
    $image_file = 'D:\Photoes\2013\IMG_0213.jpg';
    $image_type='';

    if(file_exists($image_file)){
    $type = exif_imagetype($image_file);

    switch($type){
    case IMAGETYPE_GIF:{
    $image_type = 'GIF';
    }break;
    case IMAGETYPE_JPEG:{
    $image_type = 'JPEG';
    }break;
    case IMAGETYPE_PNG:{
    $image_type = 'PNG';
    }break;
    case IMAGETYPE_BMP:{
    $image_type = 'BMP';
    }break;
    default:{
    $image_type = 'Not gif,jpeg,png,or bmp';
    };
    }
    echo 'Image type is '.$image_type;
    }else{
    echo 'File does not exists';
    }

    ?>

    2. How to read exif image headers using php?

    exif_read_data() function reads the exif headers of a image file. This method returns an array of Meta data related to the image. Return details can be differ from camera to camera. Returned array is an associative array with header names as indexes. If no data found it returns FALSE. Following example prints all exif information of a given image.

    <?php
    $image_file = 'D:\Photoes\2012\DSC02710.JPG';
    $image_type='';

    $tab=str_repeat('&nbsp;',12);
    if(file_exists($image_file)){
    $details=exif_read_data($image_file);
    foreach($details as $key=>$val){
    echo $key.' = '.$val.'<br/>';
    if(is_array($val)){
    foreach($val as $key2=>$val2){
    echo "<span style=\"margin-left:30px;\">".$key2.' = '.$val2.'</span><br/>';
    }
    }
    }
    }else{
    echo 'File does not exists';
    }

    ?>

    3. Read image Meta data information more..

    Sometimes you may be need to get the date that the photo was taken, Camera Model and Make, ISO Speed Ratings, GPS data, file size, resolution, width and height, and so on. Please refer following sample codes/scripts to read image Meta data. Some of these may not work with older images. But now most digital cameras embedded more image details with the produced image. So it is good practice to check your code with images which are taken from different camera models.

    <?php
    $image_file = 'D:\Photoes\2011\19062011433.jpg';

    if(file_exists($image_file)){
    $details = exif_read_data($image_file);
    }else{
    die('File does not exists');
    }
    ?>

    Please note that I have use above $details array for following examples. So you have to define it at the top of your script.

    (a). How to get file name and file size using exif data?

    echo 'File name is '.$details['FileName'].' and size is '.number_format(($details['FileSize']/1024),2).' Kb';

    (b). How to get image create date time using php?

    echo $details['DateTimeOriginal'];

    (c). How to get camera model and make in php?

    echo 'Make is '.$details['Make'].' and model is '.$details['Model'];

    (d).How to get mime type using exif image data?

    echo 'Mime type is '.$details['MimeType'];

    (e). How to find image width and height using php exif details?

    echo 'Height = '.$details['COMPUTED']['Height'].'px and Width = '.$details['COMPUTED']['Width'].'px';

    or you can use following code.

    echo 'Width = '.$details['ExifImageWidth'].'px Height = '.$details['ExifImageLength'];

    4. How to read GPS data of an image taken from a digital camera?

    GPS data helps to identify the where the image is taken from. It is useful load image location in a Google Map. You can use these latitude and longitude to create a Google Map. Most of latest digital cameras,smart phone cameras, and mobile phone cameras embedded the GPS data in to images taken. Please refer following examples. Before you read exif GPS data, please make sure your camera supports for automatic location tagging (geotagging) of images and videos. In the exif data array there is a key named 'SectionsFound'. First of all you have to check GPS section is included in it. If GPS section exists you can make sure that photo contains GPS data such as latitude and longitude.

    <?php
    $image_file = 'D:\Photoes\2011\IMG_0712.jpg';

    if(file_exists($image_file)){
    $details = exif_read_data($image_file);
    $sections = explode(',',$details['SectionsFound']);

    if(in_array('GPS',array_flip($sections))){
    echo format_gps_data($details['GPSLatitude'],$details['GPSLatitudeRef']);
    echo '<br/>';
    echo format_gps_data($details['GPSLongitude'],$details['GPSLongitudeRef']);
    }else{
    die('GPS data not found');
    }
    }else{
    die('File does not exists');
    }

    function format_gps_data($gpsdata,$lat_lon_ref){
    $gps_info = array();
    foreach($gpsdata as $gps){
    list($j , $k) = explode('/', $gps);
    array_push($gps_info,$j/$k);
    }
    $coordination = $gps_info[0] + ($gps_info[1]/60.00) + ($gps_info[2]/3600.00);
    return (($lat_lon_ref == "S" || $lat_lon_ref == "W" ) ? '-'.$coordination : $coordination).' '.$lat_lon_ref;
    }


    ?>